An Introduction to Active Directory Enumeration
I originally developed this blog for the Renegade Labs team at risk3sixty, and have cross-posted it here for replication of my personal work.
| Mitre ATT&CK Technique | ID |
|---|---|
| Account Discovery: Domain Account | T1087.002 |
Active Directory is a platform that has received plenty of attention from adversaries and operators over the years. It has a rich history of exploitaiton methodologies, and new abuse mechanisms and regularly released by security researchs. Combine these factors with the prevalence that it is encountered within organizations, and you can quickly see why it’s a favorite target for attackers.
There are a plethora of toolsets, cheatsheets, and enumeration options for Microsoft’s flagship directory service. Let’s outline a few of our favorite tools (hint: BloodHound) one can use to begin enumerating an Active Directory environment.
GetAdUsers.py
We’ll start simple with the often overlooked GetADUsers.py toolset which comes with the Impacket library. This tool produces short, succint information about a domain’s users.

It’s not much, but sometimes this script can come in handy if you’re in a pinch and do not have the ability to install custom toolsets.
LdapDomainDump
Moving on, LdapDomainDump written by Dirk-Jan is a great lightweight toolset that quickly gathers a wide range of useful information about an environment.
In our lab, we will begin by running it with the following options:
ldapdomaindump -u 'testlab\bob' -p 'Passw0rd!' -at SIMPLE -n 10.0.0.36 dc01.testlab.local
This will authenticate to the domain controller (dc01.testlab.local) and issue a series of LDAP queries to gather information about the domain. Once this is completed, multiple output files will be placed within your current working directory:
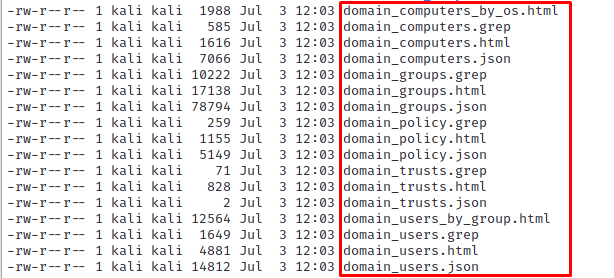
Typically during an engagement I’ll use the .html files to view information. For example, if we open domain_users.html, we can see a succint listing of each user within the domain, their password flags, description field, and other historical information like the last time they logged on.

The description field in particular may prove to be useful during a penetration test, as in some cases an account’s password is placed within this field when it is created.
Throughout several engagements, Renegade Labs operators have been able to use output from this tool to highlight attack paths, identify weaknesses within environments’ policy configurations, or gather context for a domain’s administration tendencies prior to further exploitation.
BloodHound
BloodHound is a graphical toolset that graphs and maps attack paths between objects in Active Directory. It was created by _wald0 (Andy Robbins), harmj0y (Will Schroeder), and CptJesus (Rohan Vazarkar) from SpectreOps, who painstakingly put together an amazing piece of software that is used by defenders and attackers alike.
So why is it so useful? Well it maps attack paths that otherwise would be extremely difficult to identify much less manage and catalogue at scale.
It does this by using Graph Theory:
“graph theory is the study of graphs, which are mathematical structures used to model pairwise relations between objects. A graph in this context is made up of vertices (also called nodes or points) which are connected by edges (also called links or lines)”
Via: https://en.wikipedia.org/wiki/Graph_theory
Why is it so useful? Why does graph theory matter?
Take, for example, the following group in Active Directory named “Fax Machine Users”.
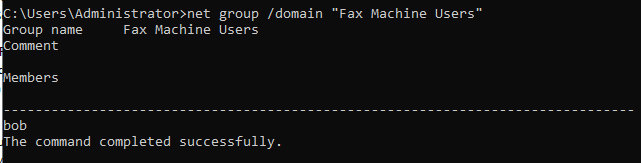
We can see that the “bob” user is a member of the group.
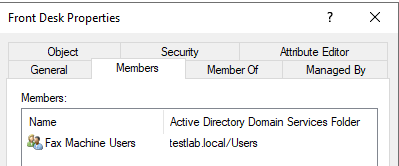
If we take a look at the alternate “Front Desk” group however, we can see that the “Fax Machine Users” group is nested within it. Bob is a member of “Fax Machine Users”, which means he inherits any access rights granted to that group and also any rights granted to the “Front Desk” group.
You might already be able to see how convoluted this can get. Without good PowerShell queries nested group membership is very hard to track, and even if one can identify it visualization of the relationships is strenuous. Now picture an environment with hundereds if not thousands of global groups, one-off access grants to groups and users, and disparate direct local administrative access. It’s a headache-indusing problem to try to track and manage as a security professional.
Now let’s see what the same configuration looks like in BloodHound:
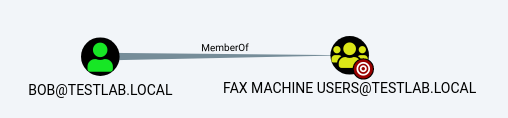
A nice illustration of Bob’s node connected to the “Fax Machine Users” node. This is through a “link” (or “edge”) called “MemberOf”, as Bob is a member of the group.
BloodHound makes the next leap even easier, by demonstrating multiple “edges” between nodes. With this visualization, we can now easily observe that Bob is a member of “Fax Machine Users”, and by extension the “Front Desk” group thanks to nested group membership.

In fact, we can visualize an entire attack path that may have otherwise been difficult to identify:

The “Front Desk” group is nested within the “Physical Security” group, and the “Physical Security” group is nested within the “Security” group. Finally, the “Security” group possesses a “GenericWrite” link to the “Domain Admins” group, effectively creating an attack path from “Bob” to complete control of the domain.
Thus one can see how what may have at first glance appeared to be a simple configuration, a single user within the “Fax Machine Users” group, can turn into an attack path an adversary can follow. It’s worth noting that this configuration traverses a “path” across three nested group memberships. Imagine trying to enumerate this by hand with PowerShell queries or “net group” statements, and you can see why BloodHound is so loved.
Using BloodHound
There’s a great body of documentation that comes with the tool. Since we usually run the toolset from a Linux environment, we follow the related installation guide here. There are associated guides for each platform one might need to install the toolset on.
Let’s quickly highlight how we gather information to be used within BloodHound during an engagement. To generate data to import into BloodHound you need to run a BloodHound “ingestor”, which is just a fancy name for a toolset that performs the neccessary queries and formatting of data used by BloodHound.
There are a few forms of these tools, namely SharpHound which is a compiled executable that can be executed on comrpomised Windows hosts, as well as the Python alternative BloodHound.py which is what we will use in this case.
This ingestor is also written and maintained by the talented Dirk-Jan, and can be easily installed with pip installed bloodhound:

_Note: you may need to update your PATH environment variable to utilize the Python Bloodhound ingestor once it’s installed. If you’re on a Kali environment, the installation process will likely include the binary in /home/kali/.local/bin.
To add this temporarily to your PATH you can run export PATH=$PATH:/home/kali/.local/bin, although you will likely want to include this in your ~/.zshrc or ~/.bashrc file._
With the Python Ingestor installed, let’s gather some data to import into BloodHound. This can be done by running “Bloodhound.py” (bloodhound-python is the program name) with the followinf arguments:
- -u: username
- -p: password
- -d: domain name
- -ns: name server

In our experience, certain options may need to be modified to allow the tool to work. Additionally, there are a suite of “collection methods” that can be controlled with the -c parameter. You can add -c all to the command to ensure that each piece of data is collected.
If we look in the directory we executed the ingestor from, we should now see a series of JSON files.

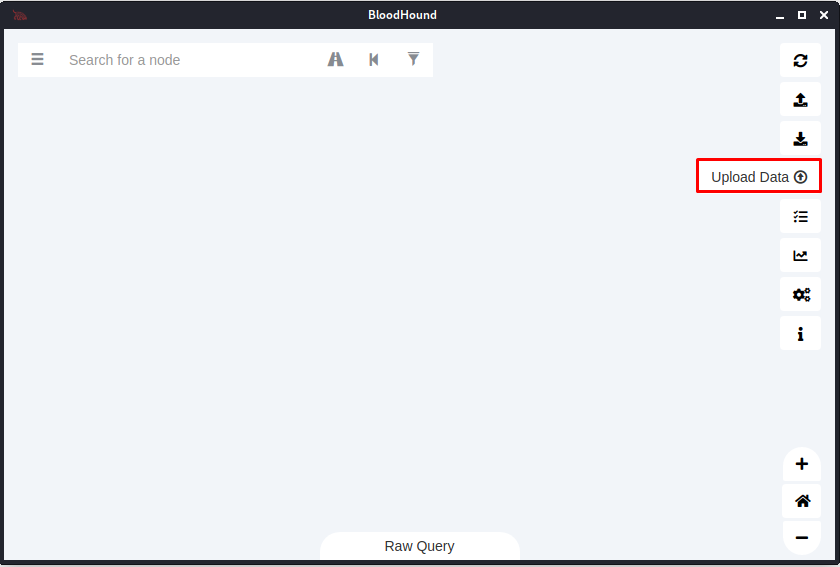
We can import these into BloodHound using the “Upload Data” button in the GUI, or by simply dragging and dropping the files into BloodHound.
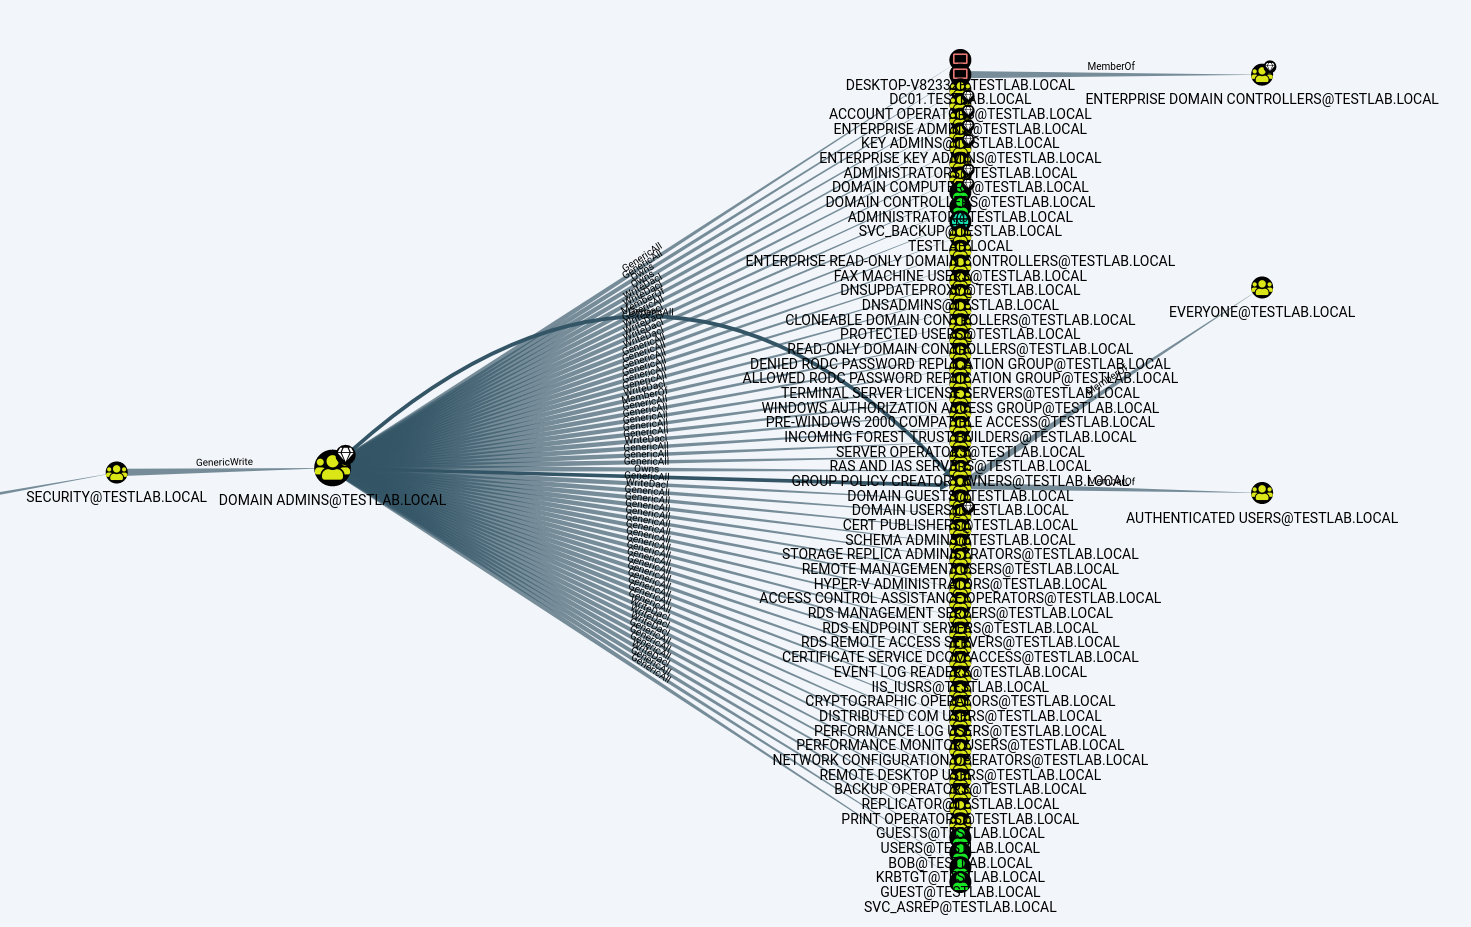
Once the data imports, you are ready to start looking around the environment. There are a number of prebuilt queries that ship with the tool. For example, below you can see the output from clicking on the “Find all Domain Admins” query in the tool.

But the analysis does not stop there. There are virtually no limits to the types of information you can gather with custom BloodHound queries. I personally like using the “BloodHoundQueries” repo from Compass Security in addition to the pre-built ones included with BloodHound.
And that’s it! Once the tool is configured and data is imported, one can reference it throughout an engagement as certain objectives are met, credentials are compromised, or attack paths need to be discovered.
This certainly does not do BloodHound, LdapDomainDump, or GetADUsers.py justice, and a more detailed post is warranted to explore all the useful features that they provide. This blog aims to simply outline a few different methods an attacker (or defender) can use to get started enumerating Active Directory environments.